Table Seating Charts Made Easy

If your event, such as a wedding, includes a formal sit down dinner, a table seating chart for your guests is vital. Arranging guests in a manner which will contribute to everyone's enjoyment of the party while taking full advantage of the facility space will ensure a smooth and pleasant occasion. Professional event planning tools exist to help you with creating a detailed seating chart for your party.
Evaluate the available event space.

After determining a close estimate of the number of guests at your event, make a time to walk the event space with your facility contact to get a general idea of the dimensions and layout of the room. Ask your facility contact what kind of tables are available - round, square, long rectangular, etc. Also inquire about the capacities of the different available tables. This will give you a rough idea how many tables are needed to accommodate every attending guest. Come up with a total number of tables you will need of each shape and capacity.
Add tables to the room layout.

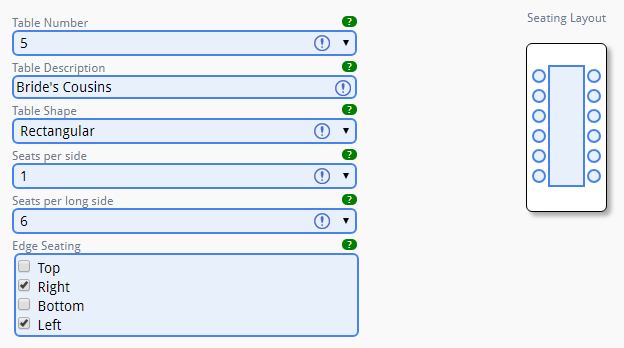
Using the graphical table seating layout tool, add all the tables, one by one, to the room layout worksheet. The tool allows you to easily define the shape, capacity, and seating restraints of each table. For example, a long table can have seating restricted to only the long sides, or a square table placed against a wall will have seating along only three sides. As you are tweaking the definition of each table, a preview will dynamically adjust to reflect those changes.
Arrange tables around the room.

Once you've added tables in the previous step, you can begin arranging them around the available space in the room. Move the tables by dragging them using the "move" handle. You can also rotate each one by dragging the "rotate" handle.

You can add more tables at any time by clicking "Add Table". To make graphical planning easier for large rooms with many tables, you can toggle "Max View" to utilize the entire screen.

Tables can be deleted from the "Tables" tab of your venue. This is done on purpose to prevent accidental removal of tables from the seating layout drawing screen.
Seat your guests at tables.

All of your invited guests that have RSVP'd "Yes" to the venue will be shown in the left panel of unseated guests. To place a guest at a table, simply drag from the left panel to any table. As more guests are added to each table, the dots representing occupied seats will get colored in. To see a quick list of everyone seated at a specific table, click the number in the center of the table and a popup with table details will appear. From the popup, you can move a guest from one table to another by dragging. Also, while the popup is open, you can remove a guest from a table - just drag from the table back to the left panel. To close the popup, simply click "X" in the upper right corner.
Will you need place cards?

After using the graphical table seating layout tool to arrange all guest seating, it's very easy to print or export place cards. Click on reports, and select either "Place Cards" or "Place Card Printable Labels", depending on whether you will be creating the place cards yourself, or sending the task out to a calligrapher or print shop.
Conclusion.
Creating table seating charts is fairly easy when utilizing the right tools. Investing a little time into building a guest list, filling out the invitation and RSVP worksheets, and using the graphical seating layout tool will certainly pay off by introducing disciplined methods into your planning process and resulting in a well organized event, whether it's a wedding, sweet sixteen, anniversary, birthday, or any other party.

